Welding is not just about joining two pieces of metal; it's an intricate dance of precision, skill, and technique, played out in various positions that challenge even the most seasoned welders. In the welding world, the weld's Position plays a crucial role in the success and strength of the joint.
But how many positions are there in welding, and why do they matter? In this blog, "How Many Positions Are There In Welding?", we will delve into the fundamental welding positions recognized in the industry. Each Position brings challenges and techniques, from flat to vertical and overhead to horizontal.
Whether you're a budding welder eager to learn the ropes or a professional looking to refine your understanding, join us as we explore the essential welding positions that every welder must master. Let's ignite our torches and discover the positions that form the backbone of welding craftsmanship, one arc at a time.
Table of Contents
The Four Basic Welding Positions
Welding, a craft that melds artistry with technical skill, is foundational to the infrastructure of our modern world. From the vehicles we drive to the buildings we inhabit, welding ensures the integrity and durability of metal structures. Understanding the four basic welding positions, each with unique challenges and applications, is central to mastering this craft.
This comprehensive exploration draws from industry-leading sources to provide a detailed look at these positions, equipping both novice and experienced welders with the knowledge to navigate the complexities of welding.
Flat Position (1g Or 1f):
The flat Position, designated as 1G for groove welds and 1F for fillet welds, is considered the most straightforward and beginner-friendly. In this Position, the weld is laid on the top side of the joint, with the face of the weld horizontal.
This Position allows for easier manipulation of the welding gun or electrode, making it ideal for learners. It's commonly used when the welded pieces can be easily manipulated to lie flat, offering a stable platform for creating solid and consistent welds.
Horizontal Position (2g Or 2f):
The horizontal Position, or 2G for groove welds and 2F for fillet welds, presents a moderate challenge as the weld is performed on the upper side of a horizontal surface against a vertical surface. This Position requires more skill to control the weld pool due to gravity's effect, making it slightly more complex than flat welding. It's often employed in structural welding where components cannot be moved to a flat position, necessitating proficiency in horizontal handling of the welding tool.
Vertical Position (3g Or 3f):
Vertical welding, indicated as 3G for groove welds and 3F for fillet welds, significantly increases difficulty. The welder must combat gravity directly, which tries to pull the molten metal downward. This Position is split into two techniques: vertical up (uphill) and vertical down (downhill), each with specific applications based on the thickness of the material and the desired penetration. Vertical welding is crucial in construction and pipeline work, where vertical seams are standard, and high-quality welds are essential for structural integrity.
Overhead Position (4g Or 4f):
The overhead Position, or 4G for groove welds and 4F for fillet welds, is considered the most challenging due to the risk of molten metal falling. Welding from beneath the joint requires exceptional skill and control to ensure a clean, effective weld without excessive spatter or droop. This Position is often encountered in repair work and construction, where welding cannot be performed from any other position due to the structure's constraints.
Advanced Welding Positions
Pipe Welding Positions:
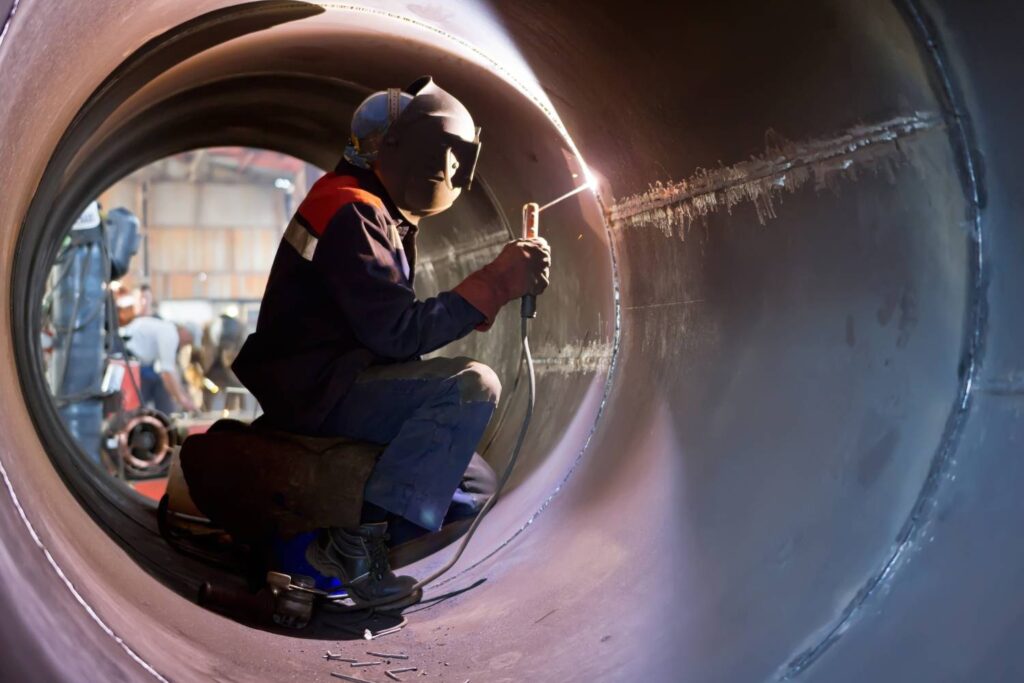
Pipe welding introduces unique challenges due to the cylindrical shape of pipes, requiring welders to master positions that allow for practical welding around the entire circumference. The 6G position, for example, is one of the most demanding, involving welding a pipe placed at a 45-degree angle. Mastery of pipe welding positions is essential for industries reliant on pipelines and tubular structures, where the integrity of welds is paramount.
Inclined Position:
While not universally recognized as a standard position, welding in inclined positions is often encountered in real-world scenarios. This Position involves welding on a horizontal or vertical plane but tilted at an angle. It requires a high degree of skill to manage the weld pool and ensure a robust and consistent weld, especially when dealing with larger workpieces that cannot be easily moved.
Multi-Position Welding:
Complex projects may require welders to transition between multiple positions, adapting their techniques to the orientation of the weld. Multi-position welding is a testament to a welder's skill and flexibility, demonstrating their ability to maintain quality and consistency across different welding scenarios. This ability is particularly valued in custom fabrication and repair work, where standard positions are only sometimes applicable.
Overcoming Gravity:
Advanced welding positions often involve working against gravity, which can influence the behaviour of the molten weld pool. Techniques such as pulsed welding or backing materials can help manage these challenges, ensuring the weld penetrates properly without excessive sagging or spatter. Welders must be adept at adjusting their methods to counteract gravitational forces, ensuring the structural integrity of the weld.
Importance Of Mastering All Positions
Welding is a multifaceted skill that demands proficiency in various positions to ensure the welds' quality, strength, and integrity.
he complexity of welding tasks across different industries necessitates a deep understanding and mastery of all welding positions, from the basic flat, horizontal, vertical, and overhead positions to more advanced and specialized orientations such as pipe welding.
This comprehensive insight into the significance of mastering all welding positions highlights the challenges, techniques, and strategic considerations welders must navigate to excel in their craft.
Enhancing Versatility And Adaptability:
Mastering all welding positions significantly enhances a welder's versatility, allowing them to adapt to any project's demands. This adaptability is crucial in industries where welding requirements vary greatly, from construction sites and manufacturing floors to pipelines and offshore platforms. The ability to weld competently in any position ensures that a welder can tackle various tasks, increasing their value and employability.
Ensuring Weld Quality And Integrity:
The quality and integrity of a weld are paramount, directly affecting the structure's or component's safety and durability. Each welding position presents unique challenges, such as controlling the weld pool in overhead welding or achieving deep penetration in vertical welds. Mastery of all positions allows welders to adjust their techniques to overcome these challenges, ensuring high-quality welds that meet or exceed industry standards.
Meeting Certification Requirements:
Many welding certifications require proficiency in multiple welding positions. These certifications are not just a testament to the welder's skill but are often mandatory for working on certain projects or within specific industries. Mastering all welding positions prepares welders for these certification exams, opening up opportunities for career advancement and access to more complex and higher-paying jobs.
Addressing Project-Specific Challenges:
Every welding project has its challenges, often dictated by the workpiece's geometry, the materials involved, and the weld's location. Proficiency in all welding positions allows welders to select the most appropriate Position for the task at hand, optimizing accessibility, weld quality, and overall project efficiency.
Contributing To Safety And Efficiency:
Proper execution of welding positions affects the weld's quality, and the welding process's safety. Mastering all positions helps welders minimize risks associated with complex welding orientations, such as the overhead Position, by employing the correct techniques and safety measures. Additionally, this mastery contributes to operational efficiency, reducing the need for rework and ensuring projects are completed within deadlines.
Training And Practice
Welding, a skill fundamental to countless industries, requires theoretical knowledge and extensive hands-on practice. Becoming a proficient welder involves mastering various:
- Masteringques, understanding.
- Understanding of different welding positions and continuous.
- Thing skills through practice. This exploration into
The training and practice of welding draw upon insights from several authoritative sources, offering a comprehensive guide for those aspiring to master this essential craft.
Mastering Welding Techniques:
The art of welding demands more than just an understanding of basic principles; it requires mastering specific techniques that vary depending on the welding process. For instance, Shielded Metal Arc Welding (SMAW), also known as stick welding, is a widely utilized process that involves creating an electric arc between a coated electrode and the base metal.
While theoretically simple, this process requires precise control over the electrode and a deep understanding of how different electrodes affect the welding outcome. Mastery of SMAW and other welding techniques comes from theoretical learning and extensive hands-on practice.
Understanding Welding Electrodes:
A critical aspect of welding training involves understanding the different types of welding electrodes and their applications. Electrodes, the consumables in welding that deliver electricity to melt and fuse metal pieces, come in various types, including stick, MIG, TIG, and flux-cored electrodes.
Each type has unique properties for specific applications, such as welding vertical and overhead surfaces or thicker metal sections. Knowledge of these electrodes and their correct usage is essential for producing high-quality welds.
The Importance Of Surface Preparation:
Another vital skill in welding is the preparation of the welding surface. The welding surface's cleanliness and condition significantly impact the weld's quality. Proper surface preparation involves removing contaminants such as rust, paint, or oil and ensuring that the edges of the workpiece are appropriately bevelled or chamfered. This preparation is crucial for achieving a solid bond and a successful welding project.
Practice And Experience:
The cornerstone of welding mastery lies in practice and experience. Welding is a skill honed over time, with each project offering new learning opportunities. Gaining experience through real-world welding projects under the guidance of experienced welders is invaluable. Continuous practice helps refine techniques, improve problem-solving skills, and build confidence in handling complex welding tasks.
Continuous Learning And Improvement:
The welding field is ever-evolving, with new technologies and techniques emerging regularly. Continuous learning is crucial for any welder looking to stay ahead in the field. This includes staying updated on the latest welding processes, safety standards, and industry best practices. Engaging in professional development and training opportunities further enhances a welder's skills and knowledge base.
Conclusion
Welding is a complex craft that involves joining two pieces of metal, with each Position playing a crucial role in the joint's success and strength. The four basic welding positions are flat, horizontal, overhead, and vertical. The flat Position is the most beginner-friendly, allowing for a more accessible welding gun or electrode manipulation.
The horizontal Position is moderately challenging, as it involves welding on the upper side of a horizontal surface against a vertical surface. Vertical welding, however, increases in difficulty as it requires direct combat with gravity to pull molten metal downward. The overhead Position is the most challenging, as it requires exceptional skill and control to ensure a clean, effective weld without excessive spatter or droop.
Advanced welding positions include pipe welding, inclined Position, multi-position welding, and overcoming gravity. Pipe welding is essential for industries reliant on pipelines and tubular structures, where the integrity of welds is paramount.
Inclined position welding involves welding on a plane tilted at an angle, requiring a high degree of skill to manage the weld pool. Multi-position welding is a testament to a welder's skill and flexibility, particularly in custom fabrication and repair work. Overcoming gravity involves pulsed welding or backing materials to ensure proper penetration without excessive sagging or spatter.
Mastering all welding positions is crucial for professionals to ensure the quality, strength, and integrity of their work. This skill is essential in various industries, from construction sites to pipelines and offshore platforms. It enhances welders' versatility, allowing them to tackle various tasks and increasing their value and employability.
Mastering all welding positions also ensures weld quality and integrity, which directly affects the safety and durability of the structure or component. Each welding position presents unique challenges, such as controlling the weld pool in overhead welding or achieving deep penetration in vertical welds. Mastering all welding positions prepares welders for certification exams, opening up opportunities for career advancement and access to more complex and higher-paying jobs.
Proper execution of welding positions affects the weld's quality, and the welding process's safety. Proper execution of welding positions contributes to operational efficiency, reducing rework and ensuring projects are completed within deadlines.
Mastering welding requires not just theoretical knowledge but extensive hands-on practice. Techniques like Shielded Metal Arc Welding (SMAW) and understanding welding electrodes are essential for producing high-quality welds. Surface preparation is also vital, as it significantly impacts the quality of the weld.
Practice and experience are the cornerstones of welding mastery, providing new learning opportunities and refining techniques. Continuous learning and improvement are also essential in the ever-evolving field of welding.
Content Summary
- Welding transcends mere metal joining, a precise, skilled, and technical dance across multiple positions.
- The weld's Position is crucial for the joint's success and strength, influencing the outcome significantly.
- The industry acknowledges several fundamental welding positions, each with its challenges.
- Mastering these positions is essential for anyone aiming to excel in welding, from novices to seasoned professionals.
- The blog aims to explore these positions, offering insights into the backbone of welding craftsmanship.
- The Four Basic Welding Positions:
- Understanding the four basic welding positions is foundational for welders, affecting the integrity and durability of metal structures.
- These positions include flat, horizontal, vertical, and overhead, each with unique challenges and applications.
- The flat Position (1G or 1F) is beginner-friendly, allowing easy manipulation of the welding tool.
- It's ideal when pieces can be easily positioned flat, providing a stable platform for consistent welds.
- The horizontal Position (2G or 2F) introduces moderate challenges, requiring skill to control the weld pool against gravity.
- Vertical welding (3G or 3F) significantly increases the difficulty, with gravity pulling the molten metal downward.
- Techniques vary between vertical up (uphill) and down (downhill), depending on material thickness and desired penetration.
- The overhead Position (4G or 4F) is the most challenging, with risks of molten metal falling and demanding exceptional skill and control.
- Mastery of these basic positions is crucial for high-quality welds, which are essential for structural integrity.
- Advanced Welding Positions:
- 15. Pipe welding adds complexity due to the cylindrical shape of pipes, requiring mastery over entire circumferences.
- The 6G position, involving a pipe at a 45-degree angle, is among the most demanding.
- Mastery of pipe welding positions is vital for industries relying on pipelines and tubular structures.
- Welding in inclined positions, though not standardized, is common, requiring high skill levels for effective execution.
- Multi-position welding showcases a welder's skill and flexibility, which are crucial for custom fabrication and repair work.
- Advanced positions often involve combating gravity to ensure proper weld penetration and integrity.
- Techniques like pulsed welding help manage these challenges, maintaining weld quality.
- Importance of Mastering All Positions:
- Proficiency across various positions ensures weld quality, strength, and integrity.
- Welders face complex tasks across industries, necessitating a deep understanding of all positions.
- Mastering all positions enhances a welder's versatility and adaptability, which is crucial for tackling diverse projects.
- It ensures weld quality and integrity, impacting the safety and durability of structures and components.
- Certification often requires proficiency in multiple positions, opening up career advancement opportunities.
- Proficiency allows welders to select the most appropriate Position for each task, optimizing project outcomes.
- Mastery contributes to safety and efficiency, minimizing risks and the need for rework.
- Training and Practice:
- 29. Becoming a proficient welder requires theoretical knowledge and extensive hands-on practice.
- Mastery of welding techniques varies with the process, demanding precise control and understanding.
- Understanding different welding electrodes and their applications is critical for producing high-quality welds.
- Surface preparation is vital, significantly impacting weld quality.
- Practice and experience are cornerstones to welding mastery, with each project offering new learning opportunities.
- Continuous learning and improvement are crucial in the evolving field of welding.
- Updating the latest processes and safety standards enhances a welder's skills and knowledge.
- The blog provides a comprehensive guide for aspiring welders, drawing upon authoritative sources.
- It highlights the importance of mastering specific welding techniques, such as Shielded Metal Arc Welding (SMAW).
- Knowledge of welding electrodes and their correct usage is essential for high-quality outcomes.
- Proper surface preparation, including removing contaminants and ensuring edge readiness, is crucial for a successful weld.
- Real-world welding projects under experienced guidance offer invaluable experience.
- Continuous practice refines techniques and builds confidence in handling complex tasks.
- Professional development and training opportunities are encouraged for skill enhancement.
- The blog underscores welding's multifaceted nature, requiring a blend of artistry and technical skill.
- It highlights welding's role in modern infrastructure, from vehicles to buildings.
- The exploration of welding positions aims to equip welders with the knowledge to navigate the craft's complexities.
- Detailed examination of basic and advanced welding positions informs and educates the welding community.
- Mastering all welding positions is essential for career growth and project success.
- The blog presents the challenges and strategic considerations of welding to help welders excel.
- As a comprehensive exploration of welding positions, techniques, and training, the blog aims to ignite a passion for welding.
- Encouraging mastery of the positions that form the backbone of welding craftsmanship is a guide for learning and professional refinement.
Frequently Asked Questions
There are four basic welding positions: flat (1G or 1F), horizontal (2G or 2F), vertical (3G or 3F), and overhead (4G or 4F). Each Position is designated by a number and a letter, where "G" stands for groove weld and "F" for fillet weld.
Welding positions are crucial because they directly affect the ease of welding, the weld quality, and the joint's strength. Each Position presents unique challenges, requiring specific skills and techniques to overcome.
The flat Position (1G or 1F) is generally considered the most accessible welding position because it allows for the welder's most stable and comfortable posture, making it easier to control the welding process.
The overhead Position (4G or 4F) is often regarded as the most challenging due to the difficulty of controlling the weld pool and the risk of molten metal falling.
There are advanced welding positions, especially for pipe welding, such as the 6G position, which involves welding a pipe at a 45-degree angle. These positions require mastering welding in various orientations around the pipe's circumference.